One of these endless nights I was mindlessly scrolling twitter until I saw a preview of a free course which promised to teach the basics of C++ with a small project: writing an automatic crossword solver. Being interested in learning more about C++, I immediately tried to follow it. The course is avaiable at the following url
After having finished it, I have to say it was a fun and rewarding experience, and I definitely recommend it. Which brings us to the point of this blog post: to offer a complete writeup, a summary of sort, of the entire content of that course (at least the beginners part). It is not meant as a replacement, for the course is definitely enjoyable in and of itself. Still, I wanted to write it and so I did.
Feel free to skip to the parts that interest you more. The final code is avaiable on my public personal archive.
#Initial Considerations
Before beginning some initial considerations and explanation are worth mentioning.
#Setting up the Environment
If you are using arch linux to get a c++ environment running you can simply use the packat manager pacman to download the c++ compiler.
sudo pacman -S gcc
Consider now the following simple c++ program.
#include <iostream>

using namespace std;

int main() {
  cout << "Hello World!\n";
}
To compile and execute it simply write it to a file named
hello.cpp and execute the following commands
g++ hello.cpp -o out./outHello World!
#On using C++
While C++ does not enforce its object-oriented nature like Java does, it still supports a lot of constructs and abstractions which are usually found in object-oriented programming. No surpirses here: after all C++ is an object-oriented language. There's a lot to say about this particular paradigm of programming, which in university settings is typically sold as only possible approach, regardless of the problem at hand. This however would clearly bring us way distant from the objective of this blog post. Throughout the rest of the article we'll thus make use of various abstractions offered by the object-oriented nature of C++. It will be left to the reader the task of judging whether or not the abstractions introduced bring real, tangible value for solving our particular problem, or if they simply add unnecessary complexity.
#Using the Default Namespace
A namespace is used to contain a set of symbols under a common name. This is done so that when we call a function or declare a variable with a particular type, the compiler knows where to look for the definition of such function or type.
Among all possible namespaces in a program, C++ lets you define a
particular namespace, called the default namespace. When we call
a function or declare a type without explicitly specifying to
which namespace we're referring to, the default namespace is used
instead. Since we'll make heavy-use of the standard C++ library,
we'll set the default namespac as the std namespace, which is the
namespace defined by the standard C++ library.
The following code might help in gaining an intuition regarding the concept of namespaces
// import the string type from the standard C++ library
#include <string>

// we're telling the compiler to use std as the default namespace
using namespace std;

// suppose for example we want to use a string.
// -- having defined std, we can simply write
string s;
// -- we can also write the following. This in particular would be
// -- necessary if we hand't defined std as the default namespace.
std::string s;

// now we import another library which defines another string in
// another namespace called 'foo'
#include <foo>

// -- to use the string defined in <foo> we'd write
foo::string s1;

// -- to use the old string, the one defined in <string>, we'd write
string s2;
// -- or, equivalently
std::string s2;
#Looking up Documentation
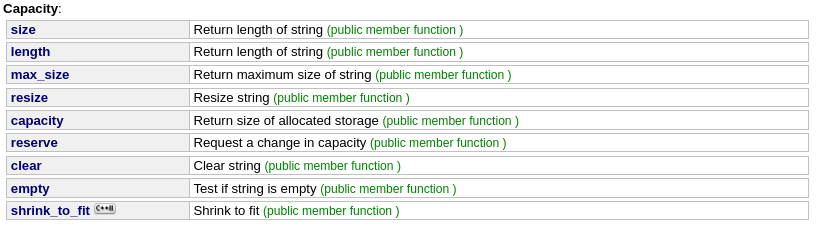
When reading a piece of code, if something confuses you or you simply don't know what a particular method does, you can (and should) always check out some documentation, such as, for example, the site cplusplus.com.
Example: suppose you have a string and want to compute its length. To figure out the specific name of the method to call, a simple google search of the form "string c++ references" or "c++ compute length of a string" will bring you to some documentation for the string type.
With this knowledge you'd then be able to write the following code
#include <string>
#include <iostream>

using namespace std;

int main()
{
  string s = "Hello World!";
  cout << "The string " << s << " has length: " << s.length() << "\n";

  return 0;
}
Remember, programming is as much about following the rules of a particular syntax as it is about logical reasoning. Since each programming language has its own syntax, you should always start with understanding what is the next logical step to follow in your program, and only then search the pecularities of the syntax to be used.
Throughout the blog post I'll mention here and there some things specifically related to C++ syntax that should be kept in mind; most of the code however will be general enough so that ports to different programming languages shouldn't require too much effort.
Ok, the initial considerations are over. Let us now begin the discussion of the actual code of our automatic crossword solver!
#Representing the Grid
The first abtraction we'll introduce will be used to represent the grid of the crossword. As in typical object-oriented fashion, it will have a bunch of internal variables, called fields, as well as a bunch of internal functions, called methods. These fields and these methods will be accessed by instantiating the class into a particular object using a constructor.
The skeleton code for defining our grid is the following
class Grid {
public:
  // this stuff is accessible from outside

  // constructor syntax
  Grid(string n) {
    name = n;
  }

  // other methods go here...

private:
  // this stuff is only accessible from inside the class
  string name;
  vector<string> lines;
};
As we can see, our grid for now has only two fields: a string,
which represents the name of our grid, and a vector of strings,
which in C++ is written as the type vector<string>. This vector of
strings will contain a string for each row of the crossword.
#Helper methods
As far as the other methods go, for now we'll have the following helper methods. These methods have to be written within the class, between the constructor and the private fields:
-
rows(): Returns the number of rows of the grid.
int rows() const { return lines.size(); }Notice the keyword
constin the function signature: its presence tells the compiler that this function will not modify the internal fields of the object. In this particular case we can use theconstkeyword since we just have to read a value computed usinglines. And if you are wondering why the hell would we tell the compiler such things... well, declaring that something is aconstcould help the programmer to know if he/she has, for example, modified a field he/she did not want to modify at compile time, without even running the program, thus saving a time and effort. So, if you know that a method should not modify the internal state of the object, you should defintely such theconstkeyword to indicate that. -
cols(): Returns the number of columns of the grid.
  int cols() const {
    if(lines.empty()) {
      return 0;
    } else {
      return lines[0].size();
    }
  }
In the function we simply check if the vector of strings is empty, and if it isn't we return the size of the first element of the vector, which is the number of character of the first row of the crossword, i.e. the number of columns of the first row.
-
Check(): This function checks that the internal structure of the grid is consistent, i.e. that each row as the same number of columns.
  void Check() const {
    for (string s : lines) {
      assert(s.size() == cols());
    }
  }
The macro assert() is used to stop the program from running whenever the condition we're trying to assert becomes false. This, in the same vein as the
constkeyword introduce before, could help save a lot of time when debugging our program. In general if you know that certain logical conditions have to be held in certain parts of your code, you should definitely write an assert() to make sure the condition is properly checked. If you decide to use assert remember to add the relative include statement#include <assert.h>at the start of your file. -
Print(): This function simply prints the grid, line after line.
  void Print() {
    cout << "Grid: " << name
         << " (rows=" << rows()
         << ", cols=" << cols() << " )\n";

    // -- looping with no index
    for (string s: lines) {
      cout << "  " << s << "\n";
    }

    // -- looping with index
    // for (int i = 0; i < lines.size(); i++) {
    //   cout << "  " << lines[i] << "\n";
    // }
  }
In the code we have commented out another possible way in which the loop can be done. These two methods for looping are logically equivalent, but the second one keeps track explicitly of the index value, which in some cases could be necessary to have around.
#Reading the Grid from a File
Let us now discuss the method LoadFromFile(), which takes in input a string representing a filename and loads the content of that file inside our grid object. To do this we'll have to tackle two issues:
-
How we represent the grid in a file;
-
How the characters of a file are seen by our computer;
#Grid Format
The format used for the grid will be the same as the one used in the tutorial, and it will consists of three types of symbols:
-
Letters \(A, B, \ldots, Z\) to represent the letters themselves.
-
A dash \(-\) to represent an empty cell.
-
A dot $.$ to represent a black square.
Example: The following crossword

will be represented as follows in a file named crossword
DOG....
---....
----...
-------
...----
....---
....CAT
And now, the second issue: how can we represent these characters in the memory of our computer?
#ASCII encoding
Computers can't really deal with raw characters. The memory of a computer is obtained by taking many binary digits (also called bits, that is $0$s and $1$s) and combining them together into specific chunks, which have different names depending on their size. For example, in the context of computer science a word is typically a chunk of memory comprised of \(4\) bytes, where a byte is itself made up of \(8\) bits. I say "typically" because the specific size of a word might change depending on the architecture of the processor, the operating system in use, and various other culture and technological dependant variables.
Now, with \(8\) bits you can represent the range of numbers that goes from \(0\) up to \(2^{8}-1\) = 255. The following table gives you a general overview of the relationship between the binary digits and the number they represent.
\[\begin{array}{c | l}
\text{Binary digits} & \quad \quad \quad \quad \quad \quad \text{Number} \\\
\hline
0 & 0 \\\
1 & 2^0 = 1 \\\
10 & 2^1 = 2 \\\
11 & 2^1 + 2^0 = 3 \\\
\vdots & \vdots \\\
11111100 & 2^8 + 2^7 + \ldots + 2^2 = 2^8 - 4 = 252 \\\
11111101 & 2^8 + 2^7 + \ldots + 2^2 + 2^0 = 2^8 - 3 = 253 \\\
11111110 & 2^8 + 2^7 + \ldots + 2^2 + 2^1 = - 2 = 254 \\\
11111111 & 2^8 + 2^7 + \ldots + 2^1 + 2^0 = 2^8 - 1 = 255 \\\
\end{array}\]
Even if you don't understand how the conversion actually works, that's not important for our purposes. The important thing to realize is that computer memory is made up of a bunch of $0$s and $1$s, and that by combining these bunch of $0$s and $1$s we can potentially form any number we want. And that's the catch: yes, we can form any number we want, but how do we deal with characters? After all, characters are not numbers... right?
This is exactly where the concept of an encoding comes in. Consider an alphabet, that is, a set of characters like the english alphabet \(\{A, B, ..., Z\}\). To encode an alphabet means to assign to each character of the alphabet a particular number in such a way as to allow the translation from numbers to character and vice versa. Once we passed from characters to numbers, we can then represent these numbers using binary digits as was shown in the previous table.
Example: The simplest type of assignment between characters and numbers we could imagine is the following one
\[\begin{split}
A &\longleftrightarrow 00 \longleftrightarrow 00000 \\\
B &\longleftrightarrow 01 \longleftrightarrow 00001 \\\
C &\longleftrightarrow 02 \longleftrightarrow 00010 \\\
D &\longleftrightarrow 03 \longleftrightarrow 00011 \\\
& \;\;\;\;\;\;\;\;\ldots \\\
X &\longleftrightarrow 23 \longleftrightarrow 10111 \\\
Y &\longleftrightarrow 24 \longleftrightarrow 11000 \\\
Z &\longleftrightarrow 25 \longleftrightarrow 11001 \\\
\end{split}\]
The takeway here is that with an encoding we can transform characters into numbers, which can then be memorized in a computers memory as a sequence of binary digits. Viewed under this light, an encoding is the abstraction needed to make our computers deal with characters. So yes, characters and numbers are different things, but we can transform the one into the other for our purposes through an encoding.
The ASCII encoding then is just a specific, standardized way to
assign numbers to characters. To view the specific assignment you
can simply type "ascii encoding table" in any search engine to
get the following table
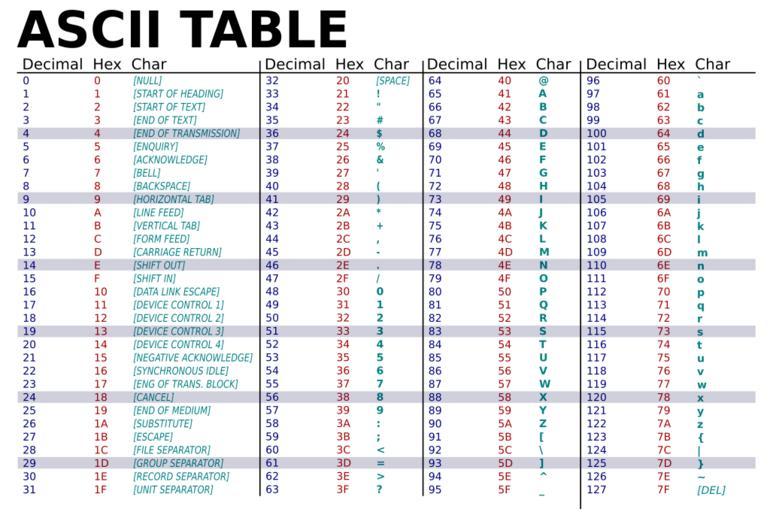
Take a look in particular at the Decimal and Char columns. We can see that in ascii \(A\) is mapped to \(41\), \(B\) to \(42\) up to \(Z\) which is mapped to \(90\).
#EoL Conventions
From the table above we can see that the ASCII encoding allows you to encode more than just letters and numbers. For our particular program we are interested in two "special characters", which are encoded in the ASCII table and which are used to indicate the so-called End of Line (EoL). The EoL is a special value that, when reading a file, signals the reader that the current line of the file is over.
In the old days of teletypes the end of line required two different concepts:
-
A carriage return (today written
\r) to move the head of the teletype to the beginning of the line; -
A line feed (today written
\n) to move the head to the next line.
Both of these concepts have found their way into the ASCII encoding, and each operating system choose to use a different combination of these two special characters to represent the EoL.
When the unix operating system came out, the original
implementors decided to signal the end of line using only a
single character: a line feed (\n). This convention was then
propagated to linux. Windows (dos at the time), wanting to be
different from the cool kids, decided to signal the end of line
with two characters: a carriage return followed by a line feed
(\r\n). Finally, MacOS decided instead to use single carriage
return (\r), and only recently has changed its represention of
the EoL to a single line feed (\n).
All of this is to say that whenever you write code to read a file, you have to be aware of these basic differences in the underlying structure of the file. To actually check out what particular end of lines your file is using you can use the hexdump utility, which prints out the bytes of the file in hexidecimal format.
echo -e "line1\nline2" > test.txt cat test.txtline1 line2hexdump -C test.txt00000000 6c 69 6e 65 31 0a 6c 69 6e 65 32 0a |line1.line2.| 0000000c
As we can see, among all the bytes present in the file, we find
the byte 0a, which in decimal is 10, which is exactly the ascii
encoding for the line feed character. This means that this
particular file uses a simply line feed to signal the end of
line (LF file).
If instead we were analyizing a windows file, as we will later do when loading valid english words in our library, we would see the following
hexdump -C top_12000.txt
00000000  74 68 65 0d 0a 6f 66 0d  0a 61 6e 64 0d 0a        |the..of..and..|
0000000e
Notice in this case that before each occurrence of a 0a we
always have the 0d. Now 0d in decimal is 13, which is exactly
the value assigned to the carriage return character in the ascii
table. In this case we say the lines of the files are CRLF
terminated, because each line ends with the bytes 0d0a, which
represent \r\n
Another quick way to check if a given file is LR terminated or
CRLF terminated is by using the utility file as follows
file test.txttest.txt: ASCII textfile top_12000.txttop_12000.txt: ASCII text, with CRLF line terminators
We're now ready to see the actual code that will read the crossword from a file into the memory of our grid object.
#Implementation
The function LoadFromFile() is implemented as follows
class Grid {
  // ....

  // this has to be inserted within the grid class
  void LoadFromFile(string filename) {
    ifstream f;
    string line;

    f.open(filename);

    // continue as long as there are new lines to read
    while (!f.eof()) {
      // get next line
      getline(f, line);

      // trim /r if present
      if(line.find("\r") != string::npos) {
	line.erase(line.size() - 1);
      }

      if(!line.empty() && line.find("#") == string::npos) {
	lines.push_back(line);
      }
    }

    f.close();
  }
  // ...
}
As we can see, the file is opened with with a call to open() on
an ifstream object. Once we're done we close the stream of bytes
with a close(). In the meantime we loop until there is another
byte available to read, and in each loop we simply read the next
line. At this point is worth noting that the getline() function
simply removes the last \n character. This means that if the
file we're reading is a windows file (CRLF terminated), then the
last character of the line will be a \r. To fix this a check is
made, and if necessary the last character of the line is removed
with the erase() function. After that, if the line read is not
empty and if it does not contain the # character - which was
simply added to ignore lines containing hashtags for comment
insertion - then we add it to our lines vector using the
push_back() method.
We're not completely finished with the grid, but before introducing the final helper methods we'll first have to introduce other abstractions.
#Representing Words
The abstraction we'll use to represent a word is a simple struct
that will act as a wrapper over the more basic string type.
struct Word {
  // need to use map with Word as value
  Word() {}

  Word(string s) : word(s) {}

  int len() const { return word.length(); }

  string word;
};
Notice that we have two constructors, each of which takes a different set of parameters. This is one of the main abstractions offered by object-oriented programming and it is referred to as overloading. Overloading is when two or more methods in one class have the same name but different parameters. In our particular case thanks to overloading we are allowing the word to be constructed in two different ways, as the following example shows
// This calls the constructor with no parameters
Word w;

// This calls the constructor with the string parameter
Word w("hello");
#Memory Management in C++
Before going any further we need to discuss the following things, which are all related to how memory is managed in C++:
-
The concept of a pointer.
-
The different ways to pass data to functions in C++;
-
The difference beteween the heap and the stack, and how to allocate memory on the heap.
If you already know these things, feel free to skip to the next section, in which we implement our second main abstraction: the library class.
#Pointers
When you learn programming languages like C and C++ at some point you will inevitably meet the concept of a pointer. To understand what a pointer is you have to understand roughly how the memory of your program is structured.
The basic idea is that all the components of a program live inside a particular memory location. From the instructions which describes the program flow to the data used and accessed by the program, everything has a memory address, and every memory address reside in a particular memory segment. The following scheme shows a typical memory layout for a 32 bit binary program running on the x86 architecture.
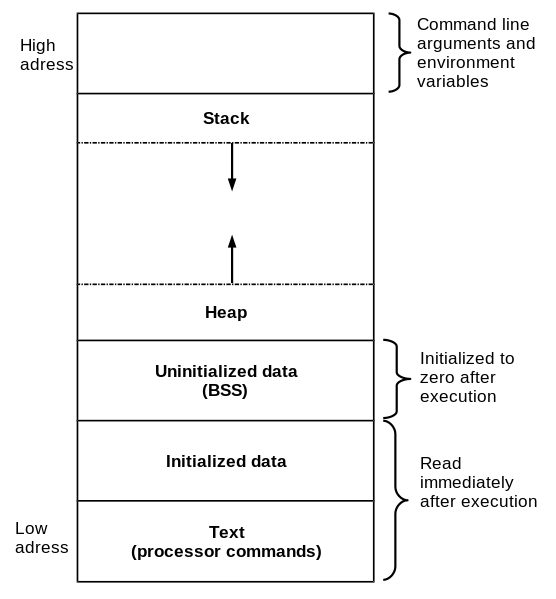
Each segment contains a specific type of data. The text segment for example contains the assembly code which will be executed by the CPU; the heap and stack instead are used to contain the more general data used by the program.
Without worrying too much about the specifics of the memory
layout, which may depend on various factors, the key takeaway
here is that everything in a program has a memory address. To
represent memory addresses we use simple hexidecimal numbers. In
C++ you can use the & operator to extract the address of a given
variable.
// prints: 'The address of variable a is: 0x7ffd9f2a9e84'
int a = 10;
cout << "The address of variable a is: " << &a << "\n";
Now, consider these two facts:
-
An address is expressed as a hexidecimal number, which is just a number.
-
Given a number, we can store it in a variable.
If we put these two facts together we immediately get that we can put a memory address, which is just a number, inside a particular variable. And that's how you get the concept of a pointer: a pointer is just a variable which contains a memory address. These variables are called pointers because they "point to" a specific location in memory. They get this special name because the data they hold refers to the memory of the program itself.
To define a pointer you need to know what you're pointing at, and
in C++ the * symbol is used as follows
// a pointer to an integer
int a = 10;
int *p = &a;

// a pointer to a word struct
struct Word w("hello");
struct Word *pw = &w;
Once you have a pointer you can interact with it in various ways
// a pointer to an integer
int a = 10;
int *p = &a;

// de-reference pointer to extract that data being pointed at
cout << "integer pointer points to the integer " << *p << "\n";
#Argument passing
Ok, so we now know that pointers are a thing. At this point you may be wondering: why the hell would we use them? What's the point of adding this abstraction? One word: efficiency.
Consider for example when you are calling a function with some
arguments. Without using pointers the processor has to copy all
the memory needed to store the arguments of the function inside a
particular memory location called a stack frame. This memory
location is generated only for executing that particular
function, and once the function is over it gets discared and
overwritten with other stuff. Now, if the arguments of the
function are simple data types, like an int, which only consists
of a bunch of bytes, then copying them over to the newly created
stack frame would be a simple operation to do, and so we wouldn't
really require pointers at all. But if one of the argument of the
function we want to call is a complex structure which is many
bytes long, then copying it all over the place would definitely
be extremely inefficient. What is much more efficient instead is
to have the complex structure allocated only once, somewhere in
our memory, and then pass only the pointer to the function.
C++ offers the following three different ways to pass arguments to a function.
-
Passing by value: This is what happens when the value of the arguments are copied to the new stack frame before the function starts executing. If we modify the value of such variables inside the function, we are not modifying the value of the original variables that we passed as arguments.
// pass x by value void Foo(int x) { cout << "FOO x = " << x << "\n"; // Prints x = 10 // we are modifying only a local copy of of the value passed x += 1; cout << "BAR x = " << x << "\n"; // Prints x = 11 } int main() { int i = 10; cout << "ORIG i = " << i << "\n"; // Prints i = 10 Foo(i); cout << "AFTER i = " << i << "\n"; // Prints i = 10 return 0; } -
Passing by reference: In this case the argument of the function is not a copy of the original value, but is instead a reference to the original value. In this case if we modify the value of the arguments inside the function the changes are also visible outside the function, because we have modified the original memory location. To pass a value by reference the keyword
&is used when declaring the arguments of the function.// pass by reference void Foo(int& y) { cout << "FOO y = " << y << "\n"; // Prints y = 20 // we are also modifying the value y in main() y += 2; cout << "BAR y = " << y << "\n"; // Prints y = 22 } int main() { int j = 20; cout << "ORIG j = " << j << "\n"; // Prints j = 20 Foo(j); cout << "AFTER j = " << j << "\n"; // Prints j = 22 return 0; } -
Passing by pointer: In this third and final case the argument of the function is declared to be a pointer. In this case we can access the location of the original value passed as argument with the
*de-reference operator in order to write to it or read from it. Passing a value by pointer or by reference gets us the same thing, but if we pass a pointer, we're able to explictly manipulate it, while if we pass a reference the pointer is only implictly used by the compiler and we don't see it in the code.void Foo(int* z) { cout << "value of z = " << z << "\n"; // Prints 0x7fffdbfac0e4 cout << "value pointed by z = " << *z << "\n"; // Prints 30 // we are adding 3 to the addr pointed by z, // which is the same addr location of the // variable k in main() *z += 3; cout << "value of z = " << &z << "\n"; // Prints 0x7fffdbfac0e4 cout << "value pointed by z = " << z << "\n"; // Prints 30 } int main() { int k = 30; cout << "ORIG addr of k = " << &k << "\n"; // Prints 0x7fffdbfac0e4 cout << "ORIG k = " << k << "\n"; // Prints 30 Foo(&k); cout << "ORIG addr of k = " << &k << "\n"; // Prints 0x7fffdbfac0e4 cout << "AFTER k = " << k << "\n"; // Prints 30 return 0; }
#Allocating memory on the Heap
Both the stack and the heap are specific memory segments that hold the data of the program. Their main difference is in how they are used.
The stack is mainly used for holding the data necessary to
properly execute a function. When you are declaring a local
variable, i.e. when you are within the body of a function and
write something like int i, the value of that variable is stored
somewhere in the stack frame of that particular function, which
is a chunk of memory situated in the stack segment of the
memory. The stack is characterized by its auto-cleaning
properties: when the function finishes its execution, the memory
that was previously allocated gets discarded. We will not get too
much into how this is implemented, but we'll just mention that to
manage this mechanism a particular register named the stack
pointer is used.
The key takeway of using the stack is that as soon as the function finishes its execution all of the memory allocated for the local variables of that function gets discared and reused. While this behavior is fine for most variables, there are also times when we require something different. Indeed, there are times when we might be inside a function and we might use a new variable, but, instead of having that variable discarded as soon as the function finishes its execution, we might require that the memory allocated for that variable has to continue to be valid. In this case we cannot use the stack; we have to resort to a different memory segment: the heap.
The heap is a memory segment in which chunks of memory are allocated and deallocated by using specific APIs. This means that, as opposed to the stack, in the heap we have much more control over the memory: we decide when we want new chunks of memory, we decide how big these chunks should be, and we also can decide whenever we are done with that memory.
The basic APIs offered by C++ to have full control of the heap segment are mainly two: malloc() (or new), used to allocate new memory, and free() (or delete), used to de-allocate previously allocated memory. Some examples of these APIs are shown below.
struct Word *heap_test(void){
  // with the 'new' keyword we're allocating a new object on the
  // heap...
  struct Word *w = new Word("hello");
  return w;
}

int main() {
  struct Word *p;
  p = heap_test();

  // ...this means that the memory allocated will still be valid even
  // when we exit the function and continue our exeuction

  cout << p << "\n"; // prints 0x55666b6e3eb0

  // the memory will only be deallocated when we explictly call the
  // 'delete' keyword.
  delete p;
}
We are now ready to continue the main discussion of our crossword solver implementation.
#The Library Class
The second main abstraction we will define is the library class, which will be used to store a list containing all the possible words that can be inserted in the crossword, as well as an interesting data structure, which we call a pattern hash, that will enable us to search efficiently for words that satisfy specific patterns.
Before defining the library class we'll introduce the following new types in our program using the typedef keyword
// list of pointers to words
typedef vector<Word*> Words;

// pattern-hash structure that maps to a string a list of pointers to
// words
typedef unordered_map<string, Words> WordMap;

// -- now instead of
vector<Word*> words;
// -- we can write
Words words;
while the first type is simply a vector, the second type, the
unordered_map is more interesting and will be discussed throughout
the rest of this section. The class library then is defined as
follows
class Library {
public:
  Library() {}

  ~Library() {
    for(Word* w: words_) {
      delete w;
    }
  }

  // other methods go here...

private:
  // master vector of words
  Words words_;

  // patternhash
  WordMap word_map_;

  vector<int> counts_;
};
Notice the method ~Library(). This method is another
object-oriented concept known as a destructor. The destructor for
a particular class is a method that is executed everytime the
object instantiated from that class is discarded from memory. If
we have allocated the object on the heap, we can force the
execution of the destructor method by using the delete
keyword. The implementation of our particular destructor is
straight-forward: we iterate over all elements of the list words_
and we free the memory allocated for each one of them.
Let us now understand how to construct the pattern hash we've mentioned before.
#Constructing a Pattern Hash
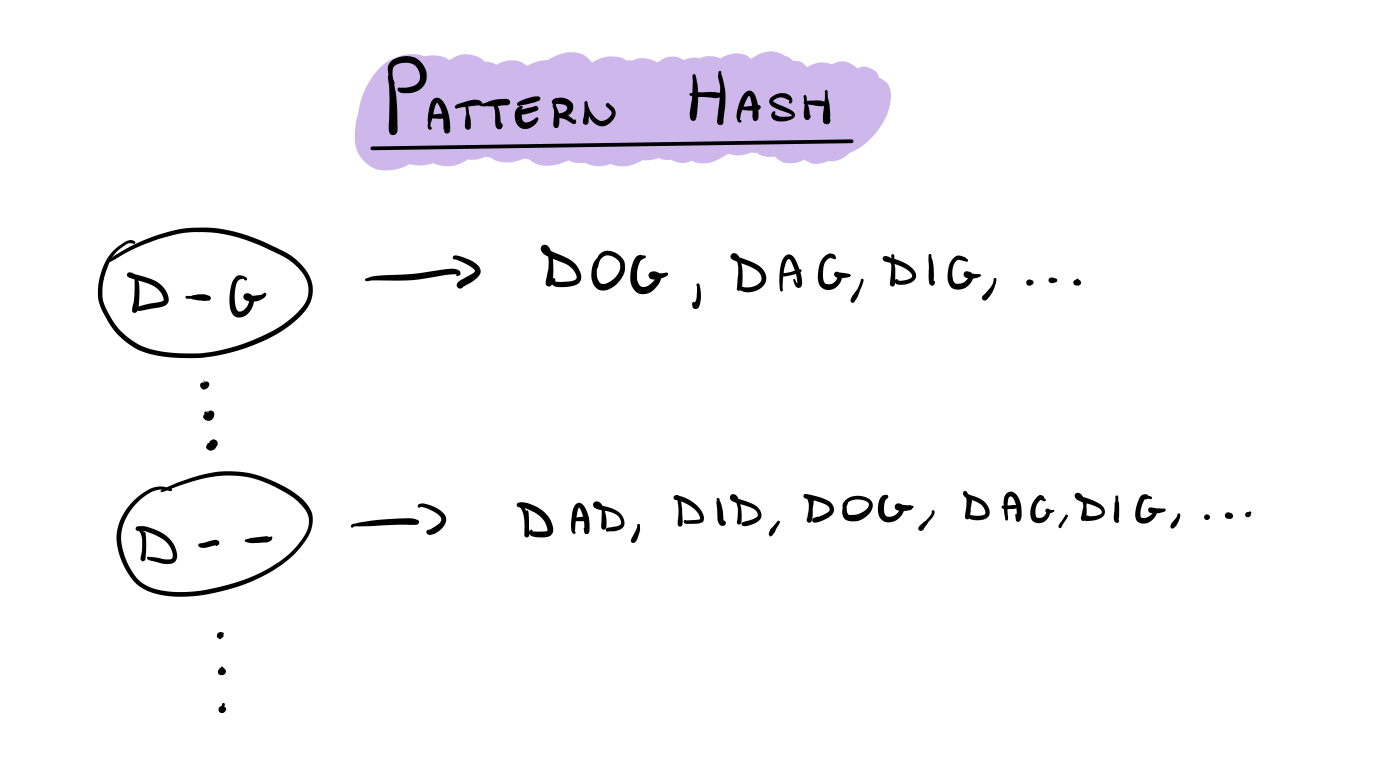
To solve our crossword puzzle we would like to build a data
structure that, given a pattern of words such as D-G, returns a
list of all possible words in our vocabulary that could "fit"
that pattern. In our example it would be all the words with three
letters that start with a D and end with a G, such as DOG for
example, but also DAG and DIG and maybe some others. We'll refer
to this data structure as a pattern hash.
Graphically speaking our pattern hash can be represented as follows
The main idea is to build this data structure as soon as we load the library so that later, when we have to solve a particular section of our crossword, we can simply query the pattern hash and get the words we need. This is called pre-processing, because we are investing processing power at the start so that later on we can quickly get what we need.
To build it we proceed as follows:
-
For every new word
wwe encounter, we generate every possible pattern that matches that word; -
For every pattern
egenerated in the step before, we add the wordwwe're processing to the list associated to patterne.
#Generating all patterns
Consider the word DOG. How many patterns can be generated from
this word? Well, we have the following:
\[\text{D O G},\,\, \text{D O -},\,\, \text{D - G},\,\, \text{D - -},\,\, \text{- O G},\,\, \text{- O -},\,\, \text{- - G},\,\, \text{- - -}\]
In total we have \(8\) patterns. Is this a surprise? Well, not really. This number comes from observing that from each letter in the original word we can define two possible patterns: one with the line character (\(\text{-}\)) instead of the actual letter, representing a placeholder value, and one with the the actual letter. This means that in total we have \(2 \cdot 2\cdot 2 = 2^3\) patterns.
The same argument can be generalized to a word of length \(n\) to
show that such word will generate \(2^n\) patterns. This means
that we can associate to each pattern a specific string of \(n\)
bits. For example, let us use the following association between
patterns and binary strings for the word DOG
\[\begin{split}
&\text{-} &\text{-} &\text{-} &\longleftrightarrow 1 1 1 \\\
&\text{-} &\text{-} &\text{G} &\longleftrightarrow 1 1 0 \\\
&\text{-} &\text{ O} &\text{ -} &\longleftrightarrow 1 0 1 \\\
&\text{-} &\text{ O} &\text{ G} &\longleftrightarrow 1 0 0 \\\
&\text{D} &\text{ -} &\text{ -} &\longleftrightarrow 0 1 1 \\\
&\text{D} &\text{ -} &\text{ G} &\longleftrightarrow 0 1 0 \\\
&\text{D} &\text{ O} &\text{ -} &\longleftrightarrow 0 0 1 \\\
&\text{D} &\text{ O} &\text{ G} &\longleftrightarrow 0 0 0 \\\
\end{split}\]
As we can see the binary string represent exactly the pattern in the following way: if the bit at position \(i\) of the string is \(0\), then the character at position \(i\) of the pattern is the original character of the word. Otherwise, if the bit at position \(i\) of the string is \(1\), then the character at position \(i\) of the pattern is the line (\(\text{-}\)).
This idea can be implemented in the following code, which makes use of bit operators that work at the level of the single bits.
void CreatePatternHash(Word* w) {
  int len = w->len();
  int num_patterns = 1 << len; // computes 2^len

  for(int i = 0; i < num_patterns; i++) {
    // generate i-th pattern

    // -- start from the original word
    string temp = w->word;

    for (int j = 0; j < len; j++) {
      // checks if the j-th bit of i is 1
      if((i >> j) & 1) {

	// -- anytime we meet a 1 in the binary representation of the
	// -- pattern, we change the corresponding character to a line.
	temp[j] = '-';
      }
    }

    // add the word to the list associated with the i-th pattern
    word_map_[temp].push_back(w);
  }
}
#Using the pattern hash
Once we have created our pattern hash to use it we implement the
following method, named FindWord(). This function takes in input
a string representing a pattern like D-G and it uses the
internal structure of the pattern hash to return all words which
fit that pattern, like DOG, DIG, etc..
// returns NULL if can't find any matches to the given pattern
const Words* FindWord(const string& s) const {
  auto it = word_map_.find(s);
  if(it != word_map_.end()) {
    return &it->second;
  } else {
    return NULL;
  }
}
Notice in the implementation we have used the keyword
auto. This keyword is used because the method find() on the
word_map_ variable returns an iterator, and the type of an
iterator is complex to write it out. By using the auto keyword
the compiler takes care of handling the details, and we can
assign the iterator to the variable it. The rest of the code
simply checks if the iterator has something to give, and if it
does, the address of the list containing all the word pointers
that match the given string pattern is returned.
Another function which uses the pattern hash is the IsWord() function, which checks if a given string is a proper word pattern or not.
bool IsWord(string s) const {
  auto it = word_map_.find(s);

  if(it == word_map_.end()) {
    return false;
  } else {
    return true;
  }
}
#Helper Methods
As we did for the grid class, let us now discuss the most important helper methods we have defined for library class.
-
ReadFromFile(): This function is analogous to the one created for the grid object. This time however instead of reading a grid we'll have to read a list of words. The particular list of words we'll use can be downloaded at the following link, it is written by Google and it contains a list of the top 12.000 words used in some time period which I am not aware of.
        void ReadFromFile(string filename) {
  	ifstream f;
  	string line;

  	f.open(filename);
  	while (f.is_open() && !f.eof()) {
  	  getline(f, line);

  	  if(!line.empty()) {
  	    line = ToUpper(line);

  	    // trim /r if present
  	    if(line.find("\r") != string::npos) {
  		 line.erase(line.size() - 1);
  	    }

  	    Word *w = new Word(line);
  	    words_.push_back(w);
  	    CreatePatternHash(w);
  	  }
  	}

  	cout << "Read " << words_.size() << " words_ from file '"
  	     << filename << "'\n";
        }
There's not much to say, since its structure is essentially the same to the grid's one. The only differences are that right after the word is read, a call to the function ToUpper() is made. This function simply returns the upper case version of the word and is implemented as follows
  string ToUpper(string s) {
    for(int i = 0; i < s.length(); i++) {
      s[i] = toupper(s[i]);
    }

    return s;
  }
Also, for every line read, a word object is created on the heap, the pointer to that object is added to the vector
words_, and the function CreatePatternHash() is called.
#Points, Spans, Slots and Attributes
We are now almost ready to define the final class. Before doing that some minor abstractions are necessary. In this section in particular we will define the following abstractions
-
A point struct, which is used to represent a particular square of our grid. A point is identified by two coordinates, a
rowindex and acolindexstruct Point { Point() {} Point(int r, int c) : row(r), col(c) {} int row = 0; int col = 0; }; -
A span struct, which is used to represent a set of points that have to be filled with the same word. To represent a span we require a length, a starting point, and a direction, which can be either vertical or horizontal.
  struct Span {
    Span(Point p, int l, bool v) : point(p), len(l), vert(v) {}

    Point GetPoint(int i) const {
      assert(i >= 0 && i < len);

      if(vert) {
        return Point(point.row + i, point.col);
      } else {
        return Point(point.row, point.col + i);
      }
    }

    Point point;
    int len;
    bool vert;
  };

  typedef vector<Span> Spans;
Notice the GetPoint() method, which returns the point at index
iof the given span. -
A slot struct, which combines a span with a given pattern string.
struct Slot { Slot(Span s, string p) : span(s), pattern(p) {} friend ostream& operator<<(ostream& os, const Slot& s); Span span; string pattern; }; typedef vector<Slot> Slots; -
An attribute struct, which is a struct that contains a bunch of data regarding a slot. In particular it says whether or not the slot has letter or has blanks.
  // Attributes of a slot
  struct Attr {
    bool is_empty() const {return has_blanks && !has_letters;}
    bool is_partial() const {return has_blanks && has_letters;}
    bool is_full() const {return !has_blanks && has_letters;}

    bool has_letters = false;
    bool has_blanks = false;
  };
#Overriding the << operator
Sometimes we want to print something other than a string or a
number or a basic type offered by the standard C++
library. Sometimes we want to print objects that we have defined
in our code. To do so we cannot simply use the << operator as we
can with simple printable objects. We have to ovverride the <<
operator.
The concept of overriding is another OOP concept, which in our particular case means the following: the same operator can have different meanings depending on its operands.
Let us suppose we want to print an object of the struct Point class we
have previously defined. To override the << operator we need to
add the following declaration inside the class definition
struct Point {
  // ...
  friend ostream& operator<<(ostream& os, const Point& p);
  // ...
};
Then, somwhere in our code, we have to define a function that
specifies how our points should be printed. In our case we want a
point p to be printed as \((x, y)\) where x and y are the
respective fields in p. Thus, we have to define the following
function
ostream &operator<<(ostream& os, const Point &p) {
  os << "(" << p.row << ", " << p.col << ")";
  return os;
}
#Filling the Span in the Grid
Before introducing the final class we have to modify the Grid
class we defined at the beginning. In particular, having
introduced the concept of a span, we want to add a vector of
spans to our grid, which will contain all of the spans of our
crossword. This abstraction will be used by the final class to
solve the crossword.
To actually fill our spans we'll use the following method
//  Add to 'span's vector with all viable spans in the grid.
void FillSpans() {
  assert(spans.empty());
  FillSpans(false); // horiz
  FillSpans(true);  // vert
}
which calls an overloaded version of itself that takes a single boolean parameter, used to specify which type of span we want to fill: horizontal ones or vertical ones.
void FillSpans(bool vert) {
  Point p;

  while(in_bounds(p)){

    while(in_bounds(p) && is_block(p)) {
      Next(p, vert);
    }

    if (!in_bounds(p)) return;

    // cout << "SPAN START: " << p << "\n";

    Point startp = p;
    int startpRow = p.row;
    int startpCol = p.col;
    int len = 0;

    do {
      Next(p, vert);
      len++;
    } while (in_bounds(p) && !is_block(p) &&
	     !((vert && startpCol != p.col) || (!vert && startpRow != p.row)));


    // cout << "END OF SPAN!! len=" << len << "\n";

    spans.push_back(Span(startp, len, vert));
  }
}
This function does the following: using the helper functions in_bounds() and is_block(), it starts from the top-left square and it moves the point to the next square using the Next() method until it finds an empty square. Notice that this movement could either be horizontal or vertical, depending on the boolean flag passed. As soon as an empty square is found, it starts to record the initial position of the span, and it keeps going until either the current row/line column is over, or until we meet a block square. At the end the span is pushed back into the relative vector.
The function Next() abstracts the movement of the square depending on the direction (horizontal/vertical) and such that if we are moving horizontally and we reach the end of the current row, then we start from the start of the next row (if it exists).
// Increment the point across the grid one box at a time. It returns
// true if point is still in bounds
bool Next(Point& p, bool vert) const {

  if(vert) {
    // increment vertically
    p.row += 1;

    // do we have to move to the next column?
    if(p.row >= rows()) {
      p.row = 0;
      p.col += 1;
    }

  } else {
    // increment horizontally
    p.col += 1;

    // do we have to move to the next row?
    if(p.col >= cols()) {
      p.col = 0;
      p.row++;
    }
  }

  return in_bounds(p);
}
#Getting the attributes of a Slot
To actually fill the attribute struct with the proper information regarding a span, the following method is defined within the Grid class.
// returns the string specified in a span on the grid.
// fills in attributes of the string
string GetString(const Span& s, Attr& attr) const {
  int len = s.len;
  string temp;
  temp.resize(len);

  for(int i = 0; i < len; i++) {
    Point p = s.GetPoint(i);
    char c = box(p);

    if(c >= 'A' && c <= 'Z') {
      attr.has_letters = true;
    } else if(c == '-') {
      attr.has_blanks = true;
    }

    temp[i] = box(p);
  }

  return temp;
}
We are now ready to discuss the final class.
#The Solver Class
The Solver class is the last class we'll introduce. It contains two methods, but only one, the Loop() method, does all the internal work and takes care of solving the crossword in a recursive fashion. The method can be described as follows:
We start observing a specific grid object, and from that we iterate over all spans in the grid.
void Loop(Grid grid, int depth) {
  depth++;

  Slots empty_slots;
  Slots partial_slots; // these are the ones we want to work on
  Slots full_slots;

  for (const Span& s : grid.spans) {
    //...
  }
For each span we extract its attributes and, depending on its type, we add it to a specific vector. We'll thus have a vector of empty slots, containing spans that are completely empty; a vector of partial slots, containing spans that are only partially filled, and a vector of full slots, containing spans that are completely filled.
// ...
Attr attr;

string temp = grid.GetString(s, attr);

// correctly classify the type of span
if(attr.is_empty()) {
  empty_slots.push_back(Slot(s, temp));
 } else if(attr.is_partial()) {
  partial_slots.push_back(Slot(s, temp));
 } else if(attr.is_full()) {
  full_slots.push_back(Slot(s, temp));
 }
We check if all the words inserted so far are valid words using
the IsWord() method of lib, a global instance of the library
class.
// check that all words inserted so far are valid
for(const Slot& s : full_slots) {
  if(!lib.IsWord(s.pattern)) {
    // word is not valid, abort
    return;
  }
 }
We check if the words inserted so far are unique, i.e. if there are no repetitions.
// check that all words so far are unique
StringSet set;
for(const Slot& s : full_slots) {
  if(!ExistsInSet(set, s.pattern)) {
    AddToSet(set, s.pattern);
  } else {
    // found duplicate
    return;
  }
 }
Then we check if there are no partials or empty slots. If this is the case then we have found a solution, and we can print it (or do something else)
// check if a solution was found
if(num_partials == 0 && num_empty == 0) {
  cout << "SOLUTION!!\n";
  grid.Print();
  return;
 }
Otherwise we pick the next slot we want to work on and we obtain the list of all possible words that can fit that slot by matching the relative pattern
// choose next slot to work on
const Slot& slot = num_partials > 0 ? partial_slots[0] : empty_slots[0];
const Words* words = lib.FindWord(slot.pattern);
For each such word, we commit the word to the grid and recursively solve the newly created grid. Notice that this new grid will have one less span empty or almost empty, which means that it will be closer to the termination condition.
if(words) {
  // for each possible word that matches the pattern
  for (const Word* w: *words) {
    // -- commit the new word, and
    grid.WriteString(slot.span, w->word);
    // -- solve recursively remaining grid
    Loop(grid, depth);
  }
 }
#Putting it all together
The final result of our program looks like the following
Library lib; // global variable

int main() {
  Grid grid("MY GRID");
  grid.LoadFromFile("../../data/crossword_1");
  grid.Check();
  grid.FillSpans();

  lib.ReadFromFile("../../data/top_12000.txt", grid.max_size());

  Solver solver;
  solver.Solve(grid);

  return 0;
}
As we can see, the code first loads the grid, then the library,
and finally uses the solver class with the method Solve() to do
all the dirty work. Like this we are able to generate all possible
solution to the given crossword using the given vocabulary.
To actually compile it, you can use the -O2 flag to activate
compiler optimizations in order to make the resulting binary even
faster.
Having come to a conclusion, I hope it was an interesting read and that you learnt something from this. Thank you for taking the time to read it, and have fun programming!